Saturday, April 16, 2016

Project Bag Tutorial


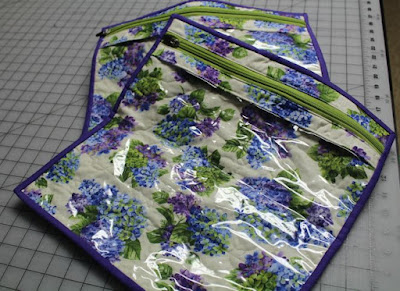
Last year on the bus trip my mom and I ran, we made project bags for everyone as their gift.  I had a bunch of help making the 40 bags we needed, my mom, Roberta, Kathy, and Twyla who put on all the binding.  They took a big chunk of my sewing time last summer but I've gotten a lot of compliments on the bags and I've seen a number of people using them so it was worth the effort.  Several people have asked how to make them so I decided to write this tutorial.  

I bought a pattern but it wasn't written well and I didn't like the way it was assembled so I decided to make up my own pattern.   This isn't my typical response to a bad pattern but what the heck, it is basically just a square.

Materials list

2 Fat Quarters
18" X 22" of batting
15" or longer zipper
5" width of fabric for binding
13" X 14.5" vinyl

Walking foot or zipper foot (optional)
teflon foot (optional but very helpful)
Wonder Clips

Instructions
1. You need to quilt the fat quarter, all of it.


2. Cut a 14.5" square from the quilted fat quarter as well as 2  1.5" X 14.5" strips.


3.  Sew the zipper to one of the quilted strips, right sides together using a 1/4" seam.


Turn the strip right side out and top stitch.  I used my walking foot with the 1/4" inch guide to install the zipper and then run the guide right next to the teeth to do the top stitching. I seem to have more control this way but I'm sure a zipper foot would work as well.  I like to use a 16" or longer zipper so I can sew the zipper on without the pull getting in the way.


4. Repeat for the other strip.

5. Sew the vinyl to the zipper strip matching the 14.5" sides using a 1/4" seam.  The vinyl should be on the right side of the zipper strip using a teflon foot.  If you don't have a teflon foot I've read that you can put Scotch Brand Magic Tape on the under side of your of your metal foot.  Don't use pins to hold the vinyl in place.  The holes won't go away.  I used Wonder clips.


6. Turn the vinyl under and top stitch in place.

7.  Line up the top of the zipper unit with the fabric  to the top of the quilted fabric square. Keep them lined up with Wonder Clips.  The vinyl will be hanging over the edge of the quilted fabric square.   You can trim it off now.  Before you start sewing, make sure the zipper pull is inside the square.  Take it from experience  the bag will be useless unless the zipper pull is inside the square.


8. Sew 1/4" around all 4 sides.  (Is the zipper pull between the two lines).  You need to make sure you use the teflon foot on this or the vinyl will be distorted and crooked.  Trim the zipper.


9.  I used a 2.25" strip for the binding.  You'll need 2 width of fabric strips.  Sew the binding on as you normally would.   I used the short version of the binding tool.  I use the longer one all the time and the only difference is the short one is a bit more fiddely.

Friday, April 1, 2016

Kelly's Doctor Who Quilt

My friend Kelly, who I met through our mutual love of Star Trek Next Generation, is going through a tough time in her life.  She is the main caregiver of her father who has Alzheimer's,  So I thought I would try to put a smile on her face and make her a Doctor Who quilt.  Kelly and I share a slight obsession about Xena, Star Trek Next Generation, and Doctor Who.  It is my opinion that Kelly is a little more obsessive about her TV watching than I am because she built a website about Xena and she even writes a blog on her TV obsessions called "Thoughts from a TV Geek".  I'm not going to mention I may have been the bigger STNG nerd since I did write a few fan fiction stories.

Wait I got a little off track, back to the Doctor Who quilt.  My friend Mary made a Doctor Who quilt for her grandson who's probably about 10 or 12.  My daughter does accuse me of having the TV IQ of a middle schooler.  Anyway, Mary had some leftover fabric and gave it to me.  Score.!!!! Turns out the fabric she gave me was 5.5" width of fabric strips so they were easy to cut up in to approximately charm pack size.  I was on the hunt for a cool charm pack quilt and found this one from Leisure Arts.  I decided it was simple enough I could figure out how to make it without a pattern.

Pre-cut Quilts - Perfect for beginners, these six quilts by janie lou come together fast and easy with precut fabrics. The simple patterns all rely on charm packs, jelly rolls, and fat quarters to provide an assortment of fun prints in ready-to-sew squares, strips, and other pieces.  Projects include An Apple a Day, a wall quilt featuring a charm pack of 5-inch squares; Backyard Fun, a throw featuring fat quarters; Coming Home, a small quilt featuring jelly roll strips; Floating 8, a bed ...:


I used EQ7 to draw it out and figure out the yardage I would need for the background material.  Such a wonderful tool.


The design I put together needed some dark background fabric which I found at Joann's and I was off to the races.  I cut the 5.5" squares from the Doctor Who fabric using my handy dandy 5.5" fussy cut square from Fons and Porter.  I ended up with 64 squares which was perfect for my design.


Then I cut the black background and white stripe cutting them to the appropriate lengths.  However, I should have just strip pieced 1 white and two blacks together then cut them in the appropriate lengths.  Even without the strip piecing putting the quilt together was pretty easy.

Once the top was assembled I wanted to design a really cool quilt motif in 5D Quilt Design Creator.  This is the software I use with my Viking Platinum 3000 and the Quilt Sew Clever robot.  I love the robot because it allows me to do designs I would never be able to do freehand.  I thought it would be fun to have the names of all the companions since the reboot in 2005 and a few T.A.R.D.I.S in the panograph I designed.  It took me 2 or 3 hours to get that done but it was pretty fun.

I grabbed some of my gray backing fabric and warm and natural batting and threw them on long arm machine.  After my problem with the robot on my last quilt, I was a little apprehensive about this pattern running correctly, but it ran flawlessly.  Yeehaw!!!!!!!!


It quilted up quickly and I giggled each time I saw the T.A,R,D.I.S. stitch out.


 I was pretty happy with the end result

Fun, fun, fun.  I hope Kelly likes it and gets a ton of use out of it but regardless, I had fun putting it together.