Wednesday, January 20, 2016

How Not to Make This Quilt

My daughter, Bre, moved to Australia in October for a new job and could really only take about 5 suitcases with her, so things like quilts and couch pillows didn't make the cut.  She has always been interested in Japanese culture and geishas so when I found some Kimono fabric from Australia (talk about the long way around) I thought it would make the perfect quilt for her bed.  I sent her this picture of the pattern that came with the fabric from Kimo Yes.

She thought this pattern didn't have much movement so she sent me a picture of this quilt called Cascade by Christine Cameli of the blog "A Few Scraps".  I must really like this quilt too as I had it pinned no less than 3 times on Pinterest.
I looked around for a tutorial or a pattern and couldn't find one so I contacted Christine to see if it would be okay if I wrote a blog on my attempt to recreate her quilt.  She graciously granted me permission.  So I was off to the races.  After about two weeks of working on this quilt I found out that Christine had written up her process on her blog in April 2011.  Check out her blog to find out the easiest way to make this quilt.  I'm documenting the way I made the quilt based on the picture and my way is definitely the hardest most time consuming way to put this together.  Do not attempt this method unless you are into tediousness.

What is really cool about my daughter having chosen this quilt is I had just shy of 5 yards of navy blue solid in my stash as well as 1 yard of blue ombre fabric so basically I had enough fabric for the top.  That never happens.  When I looked at the photo, I thought the quilt looked a little organic so I thought it was appliqued.  That was a wrong assumption but by this time I was going down the applique road.  So I chopped the 5 yards of fabric in half and sewed the two halves together.  Now I was working with about 88" square quilt top.  That should be okay for Bre's queen size bed but it is one of the biggest quilts I've made.

Next I numbered each column of rectangles to try and keep them straight in my process to recreate this quilt.  There were 30 columns.


Then I created a spreadsheet with my best guess at the size of the rectangles in each column.  I also counted the individual rectangles in a column.
Next I spent a few days cutting out the rectangles from the ombre fabric trying to maximize the cuts so I could get everything I needed from the 1 yard that I had.  I used my wonder clips to keep them all together along with their column number.  All 30 of them.


After they were cut out only then did it occur to me it would have been much easier to put the Wonder Under on the whole yard of fabric rather than on each individual rectangle.  Geez, what a dunderhead.  Thus I had to iron the fusible to each tiny little rectangle.  Can you hear me banging my head on the table?    While I was ironing on the fusible, I figured I would do raw edge applique with a blanket stitch but then I thought with my daughter's cat this quilt might get quite a few washings so I decided to turn over the edges.  You can already see where this is going.right?  I had to iron all four sides on each individual rectangle.  ARGGGGGGG.  There was no way this quilt was getting shipped as the Christmas present it was meant to be.

I wasn't concerned that the rectangles weren't ironed perfectly straight as I was going for a little more organic look. The organic look was the excuse for all the choices I made on this quilt.   If I hadn't been going for the organic look I would have pieced the thing and the math might have been a little harder but the execution would have been 10 times easier.  Organic was also the reason I didn't bother to ensure the columns were perfectly straight.  I figured water didn't flow in perfectly straight lines so if the columns were off a little that was okay.

 After sewing on the first few columns I noticed that some of the corners needed to be trimmed so they didn't peek out.  So I had to clip every corner of each rectangle.  (Shaking head).

I repinned the rectangles on the top AGAIN.  This time I ironed about 3 columns down to the fabric to secure them better.  I didn't want to do more than 3 columns at a time because smooshing them through the machine made it difficult to keep the pieces in place.

After days and days and more days of stitching on endless little rectangles.  I finally finished.  Whew, it was not fun but I was pretty happy with the result.


The easiest part of the whole process was quilting this quilt.  It appeared to me that Christine had done straight line quilting so I put the quilt on the long arm sideways and locked the machine in the vertical position.  It worked great!!!!

I used bamboo batting because it doesn't get really cold in Melbourne so this light weight batting should be sufficient.  The batting and backing were the only things I had buy so I was pretty happy about that.  I used some of the excess backing for the binding and sewed it by machine both front and back.

I used one of the built in alphabets from my Janome to make the label and the "love" stitch around the edge.  So now I've used 14 of the 250 stitches on my Janome.  Can you tell I'm keeping track of that?

I'm pleased with how the quilt turned out and I'm pretty sure my daughter is going to be pleased with it but no matter what I'm never making this quilt again.


Sunday, January 10, 2016

Birthday Class

OMG I had the best time the last two days!!!!!!  I turned 60 on Friday and my mom turns 80 on Monday and rather than have a big birthday party we decided to bring in a terrific quilt instructor, Kathy McNeil, to give us a class on landscape quilting.  We could have a total of 20 folks in the class so we opened it up to the Table Rock Quilt Guild art quilt group and quickly filled the 18 open spots.  We have been planning for a few months and finally on Friday a bunch of us set up the room at the United Methodist Church and Mom and I picked up Kathy at the airport.

Kathy's flight was due to arrive at 9:30 p.m. which meant mom and I were going to be out after dark. So exciting!!!!!  Geez, I'm getting old.  Her flight was on time but unfortunately American Airlines left Kathy's quilt stands in Dallas so it took about an hour to get all that straightened out which means we didn't drop Kathy off at the hotel until about 11:30 p.m.  Not a great start to our class weekend especially since Kathy is an early to bed woman.  But the weather was good, she was here and we were a go, plus American Airlines promised to get the quilt stands to the church on Friday morning. So basically it was all good.

I picked Kathy up at the hotel bright and early Friday morning and she was ready to go all bright eyed even though her toiletries were packed in the suitcase we left in Mom's car.  When we got to the church Mom and a few others were already there.  I brought in the lunch stuff that I'd made the day before, and received birthday greetings from the ladies.  It was delightful.  I just love my birthday unlike my daughter who would prefer to forget hers.  I enjoy my special day, nice to have the attention.

Kathy started the class right on time and gave a great presentation for about 2 hours.  Her presentation was so good.  How to give your quilt dimension, various types of applique, how to use color to your advantage.  I'm pretty sure everyone learned a ton.  I know I did.  She is a very good presenter, very clear, informative slides, and did a good job of reading her audience to make sure people were following along.  At about 10:30 the quilt stands arrived!!! (Thank you American Airlines) so we hung the quilts Kathy brought: one of her show quilts and 7 quilts that were the samples of the patterns we were making in the class. OMG they are gorgeous, gorgeous, gorgeous!!!!!!


After the morning lecture we all started working on our own quilts and I headed to the kitchen.  I'm not much of a cook but there are a few things I can make and I recently found out I can make my mom's favorite cheese soup.  A few months ago I tracked down the recipe for cheese soup from the Hotel Fort Des Moines and made it for her.  She thought it was orgasmic and proceed to tell the Art Quilt Group about it in a way that only she can.  So when we were trying to come up with a menu for the class, the cheese soup seemed perfect.   I think most everyone liked it and a couple of people even had seconds.  Yea me, I cooked for 20 and didn't run out of food!!!!!!!!  I was a bit worried about that.

The afternoon went quickly as Kathy helped us with our projects and new processes.  I was stoked to try two of the new applique methods she introduced to us, the sizing method and Apliquick.  Check out her video on Apliquick, such a cool way to do applique.  I found it pretty exciting and purchased the stick tools as well as the special interfacing.  I'm going to use it on the Jenny Beyer quilt I'm working on.  I wasn't happy doing a raw edge blanket stitch on such a beautiful quilt so this method is going to be the answer to that problem.


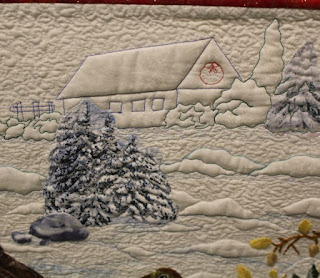
At about 2:30 p.m. Nancy Ryder-Frew delivered the cake and what a cake.  She took inspiration from Kathy's winter cabin quilt.  Not only was it a gorgeous cake but it tasted great.  I know everyone enjoyed eating it.


After the class, Mom and I took Kathy on a quick tour of the area while it was still light and had dinner in Branson.  Kathy liked the beer batter fries at Drafts Sports Bar.  She had an awesome looking Buffalo Chicken Salad and I liked my veggie burger, mom's burger was bit too big for her "little mouth" but it tasted great.  The conversation was pleasant too.

Day two of class Kathy hung another of her award winning quilts.  AMAZING!!!


Kathy packed in a ton of great information during the day.  We got a lesson on sewing your applique by hand or by machine.  I have to remember 1.5 and .03 zig zag.  In addition, she showed us how to free motion embellishments using, organza, and thread. Gotta love water soluble stabilizer.   I even helped in the demo!!!!  Such fun.


My aunt, Debbie Parks, made walking tacos for lunch and they were such a success that we decided to serve them one day of the upcoming Table Rock Quilt Guilt retreat at the library.

Later on in the day, Kathy gave a demo on the power of painting on fabric.  She demoed these awesome fabric crayons from Switzerland called Neocolor which she swears by.  They stay put and have intense color.  I'm looking forward to trying the ones my mom bought.  The last lecture dealt with ways to quilt your art quilt with some great pointers on horizon lines and borders.  Kathy is big on mitered corners. UGHH so hard to get those straight so they quilt nicely.  Something to strive for. She also gave us a hint about how she does borders which she doesn't share with most people so I'm not printing that here.  But I'm going to have to try it on my next quilt.

Here are some of the examples of the work being done in the class.


There was time the second day to continue working on our projects and even though none were completed I think most everyone was pretty happy with the results.  


I just wanted to thank everyone who helped set up the room and who stayed to help clean up.  It really helped us out a bunch.  Also wanted to thank Kathy for a great class.  What a wonderful birthday.